Showing posts with label Pyramage. Show all posts

Tuesday, March 23

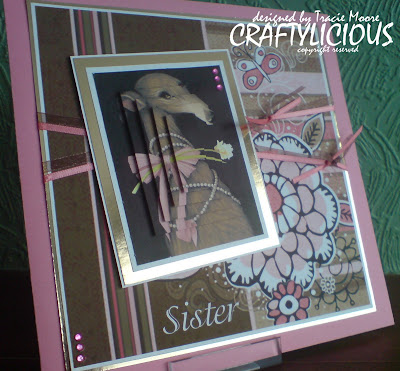
Gorgeous Greyhound

I love this card, it was really fun to make, Lots of playing on "My Craft Studio", to get everything the same colour and tints. The dog was originally grey so needed to change her to the tan the Anita's dog is. The dog was printed out onto "MCS" pyramage die cut paper, so it just needed popping out and building up with 3d foam pads.Apart from that it was just a case of printing everything out and matting and layering, with some gold mirri card. I added some ribbon knots and gems and made an envelope to match.
Happy crafting.
Tracie x

Saturday, March 20

Mini Mayhem

Now this card was fun to make. A friend from the gym i go to had a fast approaching birthday. She had recently purchased a mini (car), which she loved.

So I sent my hubby out to get a photo of the mini ... with the aim of using it on her card. Well he tried several times, it was either to dark, to bright, blurred or she hadn't come to the gym in it. A complete nightmare ... so I decided to try and find a similar looking car on the net. I searched for hours before I found this image, one problem ... the mini was red, not the gold it should be.
You may have heard me talk about a graphics program I use called "My Craft Studio", this program is simply my best purchase ever. What it can do for a crafter is unbelievable, anyway, I uploaded the photo into the program and transformed the mini from red to gold with a touch of a button. "My Craft Studio" allows you to make pyramage sheets, which you can print out onto pre-diecut sheets, so i used this for the mini.

I then made a background and a butterfly to match in the same graphics program, and printed it all out. Then with a bit of layering and some gorgeous burgundy ribbon the card was finished and she loved it.

Thanks for looking.
Tracie x

Decoupage with a Twist

Here are three Christmas cards all using the same technique ... pyramage/invertage (same as decoupage but building symmetric shapes rather than cutting around image). It's all a play on the technique of decoupage.The card that builds up is a pyramage card (built like a pyramid) and the cards that go in are invertage (inverted pyramid). This technique isn't as fiddly as original decoupage, cutting around the image because its basically a symmetrical shape reduced in size as you build up or down. And if your really careful with your cutting you can get to cards from one set of images (a pyramage and a invertage).
I edged the invertage with fine peeloffs. Each card is finished with an organza bow and the pyramage card has a poinsettia from "fred she said", sprayed with glitter for added bling.Hope these cards inspire you.
Tracie x

Saturday, November 21

A Mole Apology

This card was an order. A lady I work with, has a neighbour who for years suffered with moles in her garden. After numerous attempts at humane forms of catching them unfortunately she paid someone to rid her garden of them. She didn't have them destroyed but it must have been very distressing for the moles and she was very upset by this. My friend has a weird sense of humour and wanted a card from the moles apologising for the destruction of her garden, so set me to work on a card with this theme.
With "my craft studio" I made moles diecut pyramage, a gorgeous background and a humorous insert. Then I printed then all out. I matted and layered the front panel and added it to the card. Using spellbinders scallop nesties I made two mats and added the mole pyramage to it. Along with some leaf punches and a punched flower I decorated the front of the card.
Then I simply added the insert and voila, one sorry card from the moles to a lady who was upset she had to have them removed from her garden in such a distressing way. The card made her smile, it was a comfort to her and let's hope the moles are happier in their new home in the countryside.

Enjoy your weekend girls, back soon.
Tracie x

Friday, November 20

Toby Loves Tractor Tom

OK so I couldn't wait until tomorrow.
My great nephew was two yesterday, he's a big fan of tractor tom (a TV show for kids in the UK). So making a card for him was easy, use his name, tractor tom and two.I used "My Craft Studio" to make his name (like a word book) with B and Y on the back of the card and T and O on the front. I made some buttons in different colours and used diecut studio to make some tractor tom pyramage. Then just printed it all out.
Using eyelets I joined the back and front together, I cut out an extra T and B, added chalk around the edges to age the letters and added them to the card with 3d foam. I glazed the buttons with diamond glaze, waited for them to dry then added them to the card. I used a jigsaw piece to add the greeting with a little ribbon through the eyelets. finally I made the pyramage of tractor tom and added it to the centre of the O.I'm really love this one, and Toby's mum (my niece) loved it too.
Back later, ladies.
Tracie x

Tuesday, September 8

Pyramage Passion

Today's card ended up totally different to what I had planned, maybe because I had flu when I made it last week and my head wasn't totally with it. I just imagined it would look different somehow, anyway ...
This is another CD card made with "My Craft Studio" all designed on my PC and printed off ready to make. The background paper is one piece mounted onto gold mirror card and matted onto a black base card. The greeting was also matted onto gold mirror card. For the pyramage, I mounted the bottom layer onto mirror card and rounded opposite corners (just to be different). Then I added each layer with foam pads, the glittery effect on the pyramage was done using "Crafters Companion" - gold glitter spray (this took around 1 hour to dry). I finished the card with a couple of gold bows, hearts and a matching insert.As I said not what I thought it was gonna look like ... but I'm happy with the result.
Thanks for stopping by.
Tracie x