Sunday, March 28

Roses for Jackie

I made this cake for my best friend. She turned forty a couple of weeks ago. I happen to be a little younger, I haven't reached that milestone yet, much to her disappointment, lol.
Anyway I made the cake, filled it with jam and butter icing, then covered it with marzipan ... then along came my mum to do the icing (I don't do that bit ... it scares me frankly). Then we add the roses (that my mum made a few weeks before, to give them time to dry) and the lettering. Some piped icing in red around the base of the cake and a bow in each corner made from the same ribbon that is around the cake base.And there we go ... one 40th birthday cake ... gorgeous.

Happy crafting.
Tracie x

Friday, March 26

Popcorn Passions

I made this card using a "Crafter's Companion" cd rom - "popcorn romance". Popcorn is a gorgeous little teddy, that's been used for cross stitch for years and recently they started their range of knit-able soft toys. Around eight months ago "Crafter's Companion" did a triple disc set of popcorn for birthdays, then another set at Christmas and for valentine's day a romance set.I used the images in "My Craft Studio" and changed the colour to brown (it was various colours before). You can't see from the photo, but the contrast background paper has little horseshoes on it. I cut the backing papers diagonally, mounted the sized pieces onto gold mirri card and added thin gold peel offs for that luxurious feel. I used 1" wide ribbon around the bottom mount.Then for the top, I used nesty petite scallop circle in gold mirri card and mounted it to the card with 3d foam. Then I added the decoupage to the die cut circle and added each layer with silicone glue. I prefer silicone glue for decoupage that has a natural element, so people, animals and flowers for example wouldn't be flat in actual life, so to make them look more real, I shape each layer of the decoupage, by using silicone, I get just the right depth and shape I need, that I wouldn't be able to get if I used 3d foam pads. However each product has it's uses, for pyramage/invertage and my mats/layers, I use 3d foam pads.
Then I added a peel off greeting and a few gold gems, I made an insert to match and rounded the corners, like I did the main card. Rounding corners not only gives the card a more professional finish, but can help soften the look of a card, which is great for ladies and romantic cards alike.

A little late in the day for me, be back tomorrow.
Thanks for popping in.
Tracie x

Thursday, March 25

Wedding Woo's

Sorry I haven't posted any cards the last couple of days, but I'm busy making wedding invites for my niece, who's getting married in June.

White and gold, with ribbon and embossed hearts on the front. Tri-fold with two pockets, one for the R.S.V.P and one for the gift list, with the invite in the centre. Writing all gold embossed, with some gold stamped and embossed swirls. They've turned out to be quite time consuming with all the different elements needing to be separately before I can put them all together, but they look fantastic, so will be worth the effort.

Of course when I'm finished I'll post some pics, but not till she's sent them out, otherwise someone in the family might see them before they receive theirs ... wouldn't want to do that.

Have a great day crafting.
Tracie x

Tuesday, March 23

Gorgeous Greyhound

I love this card, it was really fun to make, Lots of playing on "My Craft Studio", to get everything the same colour and tints. The dog was originally grey so needed to change her to the tan the Anita's dog is. The dog was printed out onto "MCS" pyramage die cut paper, so it just needed popping out and building up with 3d foam pads.Apart from that it was just a case of printing everything out and matting and layering, with some gold mirri card. I added some ribbon knots and gems and made an envelope to match.
Happy crafting.
Tracie x

Kinky Boobs and Booty

This card is for a man, it was made as a joke, as he always makes out he's into kinky underwear.It was really simple to make, I used the boobs and booty template to cut out the shapes. I used the palest of pinks for the body, with a black patterned paper for the bra and panties. Using white copy paper, I border punched along the edge and used it to make a lacy effect around the garments. I added narrow double-sided tape around the bra and panties and added red ribbon that I ruffled as I stuck in down.
With eyelets and a ribbon bow to make the bra really kinky, then added a few peeloffs to emulate tattoo's and a nesty shape for his name. I could have been naughtier, but reined myself in.

Tracie x

Elegant Engagement


At Christmas my niece and her boyfriend announced their engagement. So I could wait to make a card for them.I made the topper, insert and papers on "My Craft Studio", then printed them all out onto photo paper for good quality images. On the topper, insert and design paper, I used a sakura glitter pen to highlight the flowers. I used small prima flowers with gold gems on the topper and mounted it onto gold mirri card.
To make the card I used cream ribbon tied in a bow and wrapped around it around the design paper on mirri card. Then added the topper on top. A three layer butterfly in various colours and sprayed with glitter, with gems for its body. And an extra few gems to add dimension next to their names.
Hope you've had a great day.
Tracie X

Cyclist Blues

Just a quickie this morning.I made this card using "my Craft Studio", you are able to call in images and change them (by colour, size, etc), so I made the images all the same tone of blue and printed out all the elements. The cyclist was printed onto a "MCS" circle pyramage diecut sheet and layered using 3d foam pads, mounted onto silver mirri card. I edged the word sport with a silver sakura pen, to make it stand out. I punched the screw heads out, used my embossing tool to curve them and coated them in diamond glaze, so they look like metal.
Then it was just a case of matting and layering all the components.

A great card for a cool cyclist.
Back soon
Tracie x

Misty Magic

Made to thank my hubby's Auntie for having us for lunch Christmas day. Her pedigree kitty called Misty looks just like this cat stamp, so I took a photo of her, to make sure I was colouring her the right colours, which I did with whispers brush markers on watercolour card, stamped with stayzon.
I added some tiny gems to the flowers, punched the main card with a "Martha Stewart" border punch, with a couple of layers on top, punched with a photo corner to slide the photo into. I added some ribbon and bows. Incredibly simple, but I love it.

Tracie x

Monday, March 22

Candle Celebrations

I made this candle set for my sister's birthday in January.I diecut a spellbinders scallop & plain circles, stamped a "sarahkay" image into the plain circle and coloured her in with whispers brush pens. For the band around the candle I cut to rectangles and border punched each long edge and layered them on top of each other. I attached the band around the candle with silicone glue. Then I glued the stamped image to the band and used prima flowers, some ribbon and a plastic greeting tile.I made a box to match and decorated it with curly ribbon.
*Remember to stick a label on the box telling the recipient
to remove decoration ... if they wish to burn the candle.
*
back soon.
Tracie x

Washer Wearables

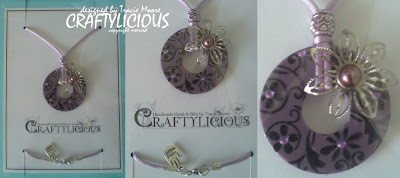
Good afternoon ladies, today I'm going to show you the necklaces I made as Christmas gifts. They were really easy. I purchased some boshers, stamped them with black stayzon, added gems, then sprayed them with gloss varnish. Then I added some beads on wire, wrapped around the bosher itself. For the necklace above I used a brad buddy for a different look. Then to finish I used silk cord and silver plated findings.
Hope you like them as much as I enjoyed making them.
Enjoy the rest of your day.
Tracie x

Saturday, March 20

No Ordinary Tag

This is my last upload for today, going out tonight so need to freshen and glitz myself up, lol.
This isn't a card, just a tag ... well not just a tag ... a tagged gift.To make this I recycled a card from last year, sprayed a fir cone gold and used a poinsettia from a tree decoration pack. All the gifts in the box are handmade by me. It's just that last year and the one before were really tight financially (as it's been for everyone), so I decided that I would make my gifts for Christmas. Not just to help save pennies but to go back to what Christmas is all about ... the act of giving something personal and sentimental. I made some necklaces (which I'll post some pics of later), some chocolates in wine glasses and a small bottle of wine. I wrapped it all in cellophane, used a bow from the same tree decoration pack and some red curly wrapping ribbon.I loved them and for those that were crafty ... well they got a little crafty surprise in their gift too. I'm definitely doing the same for this year ... I just haven't decided what yet.

Enjoy the rest of your day, be back tomorrow with more crafty treats.
Tracie x

Weight Loss Wonder

Ok I mentioned the gym a couple of posts back.

Yes ... I've plucked up the courage to go.
I first went ten weeks ago, when I weighed a hefty 14st 4lb, I weighed in last week at a less hefty 12st 5lb. That's nearly (all but 1lb) 2 stone loss in nine weeks.

I JUST CAN'T BELIEVE IT
I'M SO EXCITED


All I have to do now is lose the other 2 and a bit stone I need to.
I'm heading for 10 stone.
Fingers crossed I can do it.

Tracie x

All The Way To India

I enjoyed making this, it's not very often your asked to make a card for someone from a different culture. But the recipient of this card was spending Christmas in India and wouldn't be back here in the UK until after her birthday, which was between Christmas and New Year, so it needed to travel well.I wanted the card to reflect her cultural heritage and found some images on a cd from "my Craft Studio", the images were lovely and bright, just what i wanted. I printed out all the images, the backing paper was a tint of the original image of Indian deities. I cut the elephant out, decoupaged it and mounted it onto a nesty scallop diecut and highlighted the image with a sakura glitter pen. On the black mount I stamped some swirls with versamark and heat embossed with gold. A layer of pink, border punched with "martha stewart" arch, some flowers and organza ribbon and the card was done.
I made an insert to match using "MCS", with a lovely sentiment for birthday wishes across the miles.Thanks for stopping by.
Tracie x

F1 Fanatic

I made the decoupage for this card myself, I hunted on the net to find the right F1 car for this particular card. I printed the image out several times onto glossy photo paper and cut out each layer and decoupaged up using silicone glue.Then just matted the image onto silver mirri and layered onto the card, with some white eyelet as an accent. I made an envelobox the match.Time consuming deciding on and cutting out all the layers,
but it was totally worth it.
Tracie x

Christening Shoe

I made it for my gorgeous great niece Lexie's christening. Wanting something different from the norm, I had seen this done on "SCS" and couldn't wait to try it. I cut the pattern out onto bazzil bling card in ivory and stamped onto it with pink die based ink and added glitter to the flowers. I followed the instructions to make the shoe up and added funky foam in bright pink for the sole. I used self adhesive braiding around the sole, to hide where it had been glued to the shoe, as it looked a bit messy. With a brad for the buckle and a few punched flowers and narrow (3mm) ribbon attached to the heel, the shoe was finished.I had to make a box from scratch, I added an acetate window, some punched border strips (martha stewart) around the base to emulate fencing, with grass and flowers to finish. I used quickutz die "pea pod" and nesties for a pretty embellishment and printed out the days details onto meltdust paper and heat embossed it using silver meltdust.I am really pleased with my first attempt, many more to come I think.
Hope your having a great day.
Tracie x

Mini Mayhem

Now this card was fun to make. A friend from the gym i go to had a fast approaching birthday. She had recently purchased a mini (car), which she loved.

So I sent my hubby out to get a photo of the mini ... with the aim of using it on her card. Well he tried several times, it was either to dark, to bright, blurred or she hadn't come to the gym in it. A complete nightmare ... so I decided to try and find a similar looking car on the net. I searched for hours before I found this image, one problem ... the mini was red, not the gold it should be.
You may have heard me talk about a graphics program I use called "My Craft Studio", this program is simply my best purchase ever. What it can do for a crafter is unbelievable, anyway, I uploaded the photo into the program and transformed the mini from red to gold with a touch of a button. "My Craft Studio" allows you to make pyramage sheets, which you can print out onto pre-diecut sheets, so i used this for the mini.

I then made a background and a butterfly to match in the same graphics program, and printed it all out. Then with a bit of layering and some gorgeous burgundy ribbon the card was finished and she loved it.

Thanks for looking.
Tracie x

... Opps

I've received a few comments that I've had to reject.
This is because they didn't come through properly (they were unreadable for some reason, I don't know why).

So if you have sent me a comment that hasn't appeared, that's probably why.

So sorry if this has happened to you, please try again, i love to read your comments, it means a lot to me to hear what you think of my work.

All my love.
Tracie x

Winter Anya

Another digital download, this time from "The Greeting Farm",
aren't miss anya images just delicious.

I coloured her with whispers brush markers, wonderful colours easily blended and can be used as watercolours. A must have if like me you can't afford copics or promarkers.
I cut a rectangle border around her and did a doodle border around the edge and something for miss anya to stand on (so she didn't look like she was floating in mid air). Around the matt i used a spellbinders pendant die, cut loads and mounted them behind to add a pretty frame. Yet again I used a "FSS" poinsettia sprayed with glitter, with seed beads in the centre.

And finished with an organza bow.
Very simple, but then not every card needs to be intense to be fun.

Back later,
Tracie x

Decoupage with a Twist

Here are three Christmas cards all using the same technique ... pyramage/invertage (same as decoupage but building symmetric shapes rather than cutting around image). It's all a play on the technique of decoupage.The card that builds up is a pyramage card (built like a pyramid) and the cards that go in are invertage (inverted pyramid). This technique isn't as fiddly as original decoupage, cutting around the image because its basically a symmetrical shape reduced in size as you build up or down. And if your really careful with your cutting you can get to cards from one set of images (a pyramage and a invertage).
I edged the invertage with fine peeloffs. Each card is finished with an organza bow and the pyramage card has a poinsettia from "fred she said", sprayed with glitter for added bling.Hope these cards inspire you.
Tracie x

Santa's Little Helper

This card is using another cc designs downloadable image, I adore these cute little images. Again coloured with whispers brush pens and mounted onto an oval matt. I used spellbinders small pendant die to make the border around the oval. A glitter punched snowflake with a gem centre. Simply finished with an organza bow.A easy card with lots of impact.

Tracie x

Finally ... Bauble-lishous Christmas

Ok ... I lied, I promised I'd post weeks ago and never got round to it, I'm so sorry. But I'm finally here, with no interruptions I hope. So over the next couple of days I will be uploading everything I've been up to over the past few months.I love cc designs and this is one of their down loadable images, printed out and coloured with whispers brush pens with added glitter on the bauble for that christmasy feel. The poinsettia is from "fred she said".

Thanks for stopping by.
Tracie x

Monday, March 1

Crafter's Kitchen Blog Candy

Wow,
have you seen what Jak at Crafter's Kitchen is giving you the chance to win on her blog.

Take a look here to see and good luck, everyone.

Tracie xxx