Sunday, December 27

Merry Christmas

Merry Christmas everyone ...
I hope this message finds you all in good health, with good food and especially the best of company.

Be back soon.
Tracie & Family xxx

Tuesday, December 8

Not Forgotten

I haven't forgotten everyone, just really busy, card/gift orders for Christmas by the dozen. I've made some gorgeous washer necklaces I can't wait to show you ... so please pop back to see those, along with everything else I've been playing with.

Also, I've had lots of crafters ask how I do my faux stitching and how to make the origami frames. So once Christmas is out the way, I'll get to work on some photographic tutorials.

Enjoy your day.
Tracie x

Saturday, November 21

A Mole Apology

This card was an order. A lady I work with, has a neighbour who for years suffered with moles in her garden. After numerous attempts at humane forms of catching them unfortunately she paid someone to rid her garden of them. She didn't have them destroyed but it must have been very distressing for the moles and she was very upset by this. My friend has a weird sense of humour and wanted a card from the moles apologising for the destruction of her garden, so set me to work on a card with this theme.
With "my craft studio" I made moles diecut pyramage, a gorgeous background and a humorous insert. Then I printed then all out. I matted and layered the front panel and added it to the card. Using spellbinders scallop nesties I made two mats and added the mole pyramage to it. Along with some leaf punches and a punched flower I decorated the front of the card.
Then I simply added the insert and voila, one sorry card from the moles to a lady who was upset she had to have them removed from her garden in such a distressing way. The card made her smile, it was a comfort to her and let's hope the moles are happier in their new home in the countryside.

Enjoy your weekend girls, back soon.
Tracie x

Friday, November 20

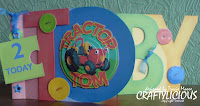
Toby Loves Tractor Tom

OK so I couldn't wait until tomorrow.
My great nephew was two yesterday, he's a big fan of tractor tom (a TV show for kids in the UK). So making a card for him was easy, use his name, tractor tom and two.I used "My Craft Studio" to make his name (like a word book) with B and Y on the back of the card and T and O on the front. I made some buttons in different colours and used diecut studio to make some tractor tom pyramage. Then just printed it all out.
Using eyelets I joined the back and front together, I cut out an extra T and B, added chalk around the edges to age the letters and added them to the card with 3d foam. I glazed the buttons with diamond glaze, waited for them to dry then added them to the card. I used a jigsaw piece to add the greeting with a little ribbon through the eyelets. finally I made the pyramage of tractor tom and added it to the centre of the O.I'm really love this one, and Toby's mum (my niece) loved it too.
Back later, ladies.
Tracie x

A Twilighter & Not Ashamed

OMGoodness, just got back from seeing New Moon with a friend, OMG it was fantastic ... awesome, I enjoyed it so much, I've booked to go Monday with my boys. If you haven't been yet, DO, its not completely true to the book but more so than Twilight was. I'm still buzzin ... lol.

I'll be back tomorrow with some cards, that's if I can calm down enough that is, see you then.
Tracie x

Monday, November 2

Baublelicious

Hello everyone, I don't know this years just been full off illness for me, I've had a major chest infection over the last week, to the point I've needed to take steroids and antibiotics. And I'm still feeling run down, but wanted to show you a quickie today. Before the chest infection I purchased these baubles real cheap (I mean 8 for 49p cheap), but they were plain and boring. So with some poinsettias I had in my stash, I jazzed them up a little. I just removed the tops, added the flowers and replaced the tops and added ribbon, so easy even the wallpaper could do it.
Hmm, maybe I need to go back and buy other colours?
Hope you like them and good health to all.
Tracie x

Friday, October 23

Fight like a Girl

I've a friend at work who has been diagnosed with breast cancer, and after seeing this image on splitcoast stampers, (a digi from whimsie doodles), I just had to make her a card.I used Fleur di lys spellbinder dyes and a ribbon with a flower and button, the image is coloured with whispers pens and I've added a few gems. Nothing more to say really.Just that all my hopes are with her.
Tracie x

Thursday, October 8

Poinsettia Passions

I am so excited to show you this card. I fell in love with the image as soon as I saw it. I limited the number of colours (red, black/silver and white), so it would give the traditional image a modern look.I simply printed out all the elements, matted the dp onto silver mirri and mounted it onto the red card base. Then I cut the image and some silver mirri with nesties label die, sprayed the flower layers with glitter varnish and decoupaged it up. I then added a chunky red bow with a heart pin and finished by adding red and silver gems to the poinsettia's. The verse I created in "mcs", and printed it out with the dp, I love making fancy greetings like this.So quick, so simple, but it's probably my favourite Christmas card I've ever made. Hope you like it too. Thanks for popping in.Tracie x

Fairie Dreams

Morning ladies, I've had a break for a couple of weeks ... catching up on family etc. I have a couple of cards today, both made using "My Craft Studio". You must all be fed up with me making cards using the PC, but I'm so in love with this program, I can't tell you how much fun it is to have complete control over the images you use. Choosing size, colour, orientation, tint the list goes on and on, anyway back to the cards.
On this one I wanted to use a floral corner image I found on "mcs - floral cd", it comes in decoupage layers, which I thought was a different slant on a card, rather than decoupaging the main image, decoupage the corner detail. I chose a fairy image and a butterfly and colour coordinated them with the corner image and dp. I matted the dp onto brown and gold mirri card, punching the bottom edges to make it pretty and then mounted this onto a burgundy card base.
I then matted the fairy onto brown and the greeting onto gold and brown card that I'd run through my cuttlebug with my scallop nesties and added both of these to the card with some brown organza ribbon in front of the fairy but behind the greeting. I continued by adding the corner decoupage and adding gold glitter pen the the flower centres so they would match the glitter on the butterfly. The butterfly I sprayed with gold glitter varnish, decoupaged the three layers up and added pink mini gems for the body. To finish I made two double bows (one slightly larger than the other) and glued them to the card.I love the way it's turned out, lovely and soft colours with a feel of magic. Hope you like it, back later.
Tracie x

Wednesday, September 23

Passionate about Poker

Morning ladies ... woke up to a dull day here, so a little crafting was in order to brighten my day. I have been playing on "my craft studio" over the past few days and designed this card, which is a real quickie. Just print out, cut out and stick.The poker decoupage is on "MCS - Carousel of Classics", so no real work needed there, all I really did was add the recipients name to the backing paper. I used 3d foam pads to add dimension and a little matting and layering. Quick, simple, yet a playful card for a passionate poker player.
Enjoy the rest of your day, thanks for stopping by.
Tracie X

Sunday, September 20

Motown Mania

This card was a request, for someone who adores Motown music. It has taken me ages to even think of what I could do, I had a total mind block.
But then ... out of the blue ... in it popped ... an idea ... and then I couldn't wait to make it. I decided to use the Motown theme in an unusual way, make a record, not the real type of course, but the type we used to play. You know when you could here what they were singing, lol. So I had to go on the hunt and find some images that I could use and yet again "my craft studio" came to the rescue. All the images are from the Hollywood greats ladies cd. So I made sure each image was the size and colour I wanted and printed them out.
I layered the jukebox image onto a printed record and made a label, just like a real record. I added peeloff borders and glitter pen to highlight the sparkles on the jukebox. I diecut scallop circles around lip images and added them to the card with 3d foam pads, with star gems and glitter pen to highlight. I aged the music background sheet for a different look and added stars and peeloffs. For the envelope I made a paper sleeve, like records used to come in.Hope you like this card. Take care.
Tracie x

Mountain Biking Hubby

It was our wedding anniversary on the 11th Sept, so a special card was needed for my hubby. He's a gym freak and loves mountain biking, so decided that should be my theme.I used "my craft studio" to size and colour my images. Using the same photo, I made one as large as the card (tinted at 50%) and one smaller to use as a topper. I made a tag and a matching greeting. Then it was just a case of printing out the elements, cutting them out, matting and layering on silver mirror card, a bit of ribbon and a gorgeous card for a gorgeous hubby.
Thanks for stopping by everyone, back later.
Tracie x

Tuesday, September 8

Totally Tooled Up

I've had a quiet few days, boys back at school, Ashley just started year 11 and Kieran year 9. Craig went back to work Monday after a two week holiday of which we had to cut short because I was diagnosed with swine flu and had to go into quarantine for seven to ten days. So I've been attempting to relax before my return to work on Friday, which also happens to be our wedding anniversary (with love to those of 9/11).I've discovered over the past few months that I quite enjoy computer crafting. I don't need to go to the shop if I need backing paper or an embellishment ... just design/make one. I can do it anytime, even at 2am and I have. I purchased a program called "My Craft Studio" (I've mentioned "MCS" loads of times) I love it. You can make embellishments, backing papers, inserts, envelopes, tags, boxes, decoupage, pyramage, in any size or colour, basically anything goes, as long as the image you are using is a jpeg ... I mean how cool does that sound. You can use an image from one of "MCS" CD's (there are are few out now ranging from Christmas, men, flowers, celebrations and more), you can even use a photo, one of your own designs or any jpeg from any craft CD you already own.So that's how this card came about, I was playing around in "MCS" and came across this image of tools. With my brother-in-law being a carpenter, I had to make it into a card for him. Using my new found best friend this is what I came up with. Then I just printed out all the components onto decoupage paper and made the card. I used a backing paper, decoupage, insert and paper buttons (glossy accents). Then printed out an envelope to match. Honestly I spent more time playing on the PC, than I did making the card ... opps ... but its seriously addictive.If you come across this program, I definitely recommend you try it, you'll be amazed at the possibilities ... I certainly have. Don't get me wrong I still love going and touching (and buying) all the gorgeous velvet/glittered/textured papers etc that you simply wouldn't get out of a printer. But computer crafting definitely has it's place in my crafting world.

With love
Tracie x

Pyramage Passion

Today's card ended up totally different to what I had planned, maybe because I had flu when I made it last week and my head wasn't totally with it. I just imagined it would look different somehow, anyway ...
This is another CD card made with "My Craft Studio" all designed on my PC and printed off ready to make. The background paper is one piece mounted onto gold mirror card and matted onto a black base card. The greeting was also matted onto gold mirror card. For the pyramage, I mounted the bottom layer onto mirror card and rounded opposite corners (just to be different). Then I added each layer with foam pads, the glittery effect on the pyramage was done using "Crafters Companion" - gold glitter spray (this took around 1 hour to dry). I finished the card with a couple of gold bows, hearts and a matching insert.As I said not what I thought it was gonna look like ... but I'm happy with the result.
Thanks for stopping by.
Tracie x

You've Been Framed

I thought you might like to see the little project I tried today.

You know what it's like we've had the children at home for the past seven weeks and you can't wait for them to go back to school for the piece and quiet, and the day they finally do go back, the house is so empty its kind of lonely, so ...I was watching craft on TV this morning with my coffee (trying to fill a gap between housework and thinking of what to cook for tea) when they made these gorgeous frames. From paper, origami folded similar to fortune tellers with no glue, just brads and ribbon. They are so simple to make.

I haven't put photos in mine yet, but think it would be better to do that before you tie the ribbon. Just imagine the possibilities (all the occasions and designs that can be done, these were just quickies to have a go, but I now have so many ideas) ... and they can be made any size (mine were made from 8"x 8" scrapbook paper and ended up 10cm square), as long as you start with a square the technique is the same.If there's enough interest, I can always do a tutorial.
Hoping you've all had a great day ... with love.
Tracie X

Tinker & Co.

Have you checked out this blog?They have some gorgeous downloads and have just started a blog skin service, for very reasonable prices. And at the moment they are offering a free blog makeover to one lucky winner ... good luck.

Sweetest First Kiss

I love Sarah Kay stamps, they take me back to my childhood. This stamp "first kiss" is so sweet, perfect for any age and many occasions.

I wanted to keep this card muted with a splash of a bright colour. I stamped the image with black stayzon and coloured it using whispers brush pens, then I embossed around the image with a gorgeous template I had cheap during a craft sale in my local store (it had no packaging ... so I don't know the manufacturer). I lightly tinted the embossing with pale green chalk, just to high light the embossing and then mounted it onto brown card and cut a thin border, just to lift the white from the cream layer beneath it. It isn't very clear on the pic, but the cream layer has been stamped with pale green hearts.I added a ready made greeting and pearly hearts from my stash. Used organza ribbon across the card, with a bow to match. The large flower is a poinsettia (a digi download from "fred she said"), but in this colour I think it can be used for any occasion. I shaped the flower with a ball tool, sprayed it with "crafter's companion" - silver glitter spray and used white seed beads in the centre. Punched some brown leaves, green branches and tiny white flowers and decorated around the card to add more interest.I think it turned out OK, it's maybe a little overworked ...
I've always had a problem knowing when to stop.

Happy crafting ladies.
Tracie x

Monday, September 7

Superhero Superpants

OK ... I've had requests for cards that I simply don't understand ... but this one had me giggling. When I was asked if I would be able to make it, I simply couldn't wait to get started. A little bit of research for the logo and colours and I was ready to plunge myself into the world of men's underpants.I used "colour my world" underpants template (same set as boobs & booties). I made the outer pants in red and did faux stitching around the edges, for the main fabric I used two shades of blue, a lighter one for the inside of the leg holes and a darker one for the main body. I used ink to tint the blue to make it look more like shaded fabric. I found a superman logo and printed it out the size I wanted onto card and used it as a template.Again I tinted the layers of the logo and added white sakura pen to highlight the it to make it look 3d. I then layered the pants onto yellow dotted card, tinted to match the underpants and added die cut stars. For the greeting/name, I used my cuttlebug to die cut my quickutz "metro" alphabet from yellow card and used butterscotch ink pad to tint the letters to match underpants and stars.
This card has been sooo much fun to make ...
and the response to it was fantastic.
Imagine the variations that are possible ... ummmmm.

With love
Tracie x

Sunday, September 6

New Addition

I thought you might like to meet the new addition to our family ... you may remember me mentioning at Christmas that my nephew and his girlfriend announced they were expecting.

Well she finally arrived on 21st July 2009.LEXIE LOUISE
What an absolutely gorgeous Great Niece we've been blessed with.
(Oh so sweet ... she has socks on her hands because the mitts are to big for her ... she is so tiny).
Congratulations Mark & Ang.

Tracie x

Cinder's Celebration

Every girls dream ... to grow up and be a princess and Katie is no exception. She loves all of Disney's princesses ... so naturally she had to have one on her card.
It took me weeks finding the decoupage on the Internet, but finally found a company that supplied them, thank goodness. The castle is made using a template by "Colour My World" (available from good craft stores/websites - UK company so not sure if available worldwide). I used three different types of card to make the castle (glitter/plain/patterned). Then added dots with a white sakura souffle pen to define the towers and white seed beads for the window sills.The front of the card is acetate, because I wanted it to look like Cinder's was standing away from the castle (I think it worked OK). Then I added a die cut sentiment and punched flowers to finish the card ... very girlie.

My sister used the same template to make a pink castle for a scrapbook page.
Happy crafting.
Tracie x

Saturday, September 5

Wolf Wilderness

I love wolves and huskies, so when I was asked to make a card with wolves on ... I had to do it.This is another cd card, using "My Craft Studio", it just let's you manipulate any jpeg image and I'm addicted to this program ... I recommend everyone has this program, especially if your a little pc challenged.
I designed the whole card on my pc and printed out all the sheets. I did three images in different sizes and mounted them onto silver mirror card and layered them at different angles on the base card. I used my cuttlebug to diecut scalloped nesties and do some spirelli with black cotton, to tone in with the card. I added a greeting tag to finish.
Ever since I started using "My Craft Studio", I've become quite taken with making inserts and envelopes that match the outside of the card. And I've sold a lot more too.

Love to you all.
Tracie x

Bountiful Butterflies

Hello Girls, I've been gone so long, I've forgotten how to blog!
With illness/recovery, 2 week holiday and then the dreaded swine flu, I've had a pretty strange few weeks. But hopefully the worst is behind me and I can finally try to get some normality back .... PLEASE!
I've managed to make a few cards over the past few weeks, though not as many as I'd have liked. So over the next few days I'll be catching up with you and letting you see the cards I've managed to do, if that's OK?Today's card is a cd card, using "My Craft Studio". It was all designed on the PC and then printed out and decoupaged etc.So I used nesties with decoupage mounted onto it, a bit of matting and layering, added a giant bow and a couple of butterflies ... oh, and gems of course.
I made an insert to match and think it's finished the card of lovely. And with the new envelo-boxes I've started making to pop my cards in, I'm really pleased with this one.
Happy crafting girls, back soon
Tracie x

Wednesday, July 29

Champayne Celebrations

Turning 65 ... what a milestone for this guy. I've used this layout several times ... I simply adore it, so classy for a man too.I stamped the background using brown dye ink and water coloured using whispers brush markers. I mounted this layer onto gold mirri card and then onto the black base card. I used Arty Farty's celebration bottle template, cut out all the pieces in co-ordinating colours and layered the pieces together, then I just added some quickutz stars and ribbon.
I made a quick envelope box to match, very sophisticated for the older gentleman.

Back soon, take care.
Tracie x

Who's Afraid Of The Big Bad Wolf?

Definitely not me ... I've turned into a twilight fan, while I was poorly with lot's of time on my hands, I decided to read twilight to see what all the hype was about, well ... I just couldn't put it down. So then I had to by the rest of the saga and before I knew it I'd read all four books thrice ... yes I did say three times ... how sad am I?

But I have to say my fave is Jacob (not Edward) ... I looked around for a tote bag ... but didn't find anything I really liked, so ... why not make my own. I used some 'iron-on transfer paper', designed what I wanted on the bag on my pc and printed them out.
Then after allowing the images to dry for 15 minutes, I cut around them but not to close as the paper has a tendency to curl if it has to many intricate shapes. I ironed the bag nice and flat, removed the backing paper and laid the images down in position. Using a piece of baking parchment (not greaseproof paper as this sticks to the image) and a hot iron (no steam), I ironed the transfers into place using a fair amount of pressure, but only for about 20 seconds on each area (otherwise the transfer will burn and lose it's colour).

I love it, and so many people have asked where I got it, cool.

Happy crafting friends.
Tracie x

Long Time No See

Hey Girls ... yes I've been away for a while, doesn't mean I haven't been crafting ... just illness/injury and recovery. But I'm finally refinding my feet and thought it was about time I tried to get back with the whole blogging scene.

Thanks to everyone who emailed me in my absence, your well wishes really did make all the difference. xxx

So let's get back to crafting.
Tracie x

Friday, June 12

Faux Stitching

Good morning everyone, no card today ... but ... I've had a request to show how I do my faux stitching!

I'm in the middle of making some superman underpants ... YES, you read right, lol. So I will take some pics as I make it and will post a tutorial, it's incredibly easy.

Thanks for the request.
Tracie x

Monday, June 8

Dad Dig's his Shed

Today's card is for Father's Day, made especially for my father-in-law, who loves his garden. Perfect lawn (you could play bowls on it, it's that flat, green and trimmed), gorgeous flower beds, tubs, hanging baskets and a bountiful veggie patch. So I just had to make a gardening card, didn't I.
I found this gorgeous decoupage sheet and thought it suited my father-in-law brilliantly. So I cut out all the layers and decoupaged them up. I added glitter pen to the cobweb's to make them glisten and stand out, made a blue scalloped background and swiss dotted it, then cut two white clouds and layered them between the sky and the shed. The fence wasn't part of the decoupage sheet, but I found it on another and thought it went well with the shed.
Then I added a sentiment to what should have been the back of the shed and cut it to size, with a matching blue background, to make a greeting tile and added some extra pots etc and a ladybird.

Thanks for stopping by.
Tracie x