Sunday, December 27

Merry Christmas

Merry Christmas everyone ...
I hope this message finds you all in good health, with good food and especially the best of company.

Be back soon.
Tracie & Family xxx

Tuesday, December 8

Not Forgotten

I haven't forgotten everyone, just really busy, card/gift orders for Christmas by the dozen. I've made some gorgeous washer necklaces I can't wait to show you ... so please pop back to see those, along with everything else I've been playing with.

Also, I've had lots of crafters ask how I do my faux stitching and how to make the origami frames. So once Christmas is out the way, I'll get to work on some photographic tutorials.

Enjoy your day.
Tracie x

Saturday, November 21

A Mole Apology

This card was an order. A lady I work with, has a neighbour who for years suffered with moles in her garden. After numerous attempts at humane forms of catching them unfortunately she paid someone to rid her garden of them. She didn't have them destroyed but it must have been very distressing for the moles and she was very upset by this. My friend has a weird sense of humour and wanted a card from the moles apologising for the destruction of her garden, so set me to work on a card with this theme.
With "my craft studio" I made moles diecut pyramage, a gorgeous background and a humorous insert. Then I printed then all out. I matted and layered the front panel and added it to the card. Using spellbinders scallop nesties I made two mats and added the mole pyramage to it. Along with some leaf punches and a punched flower I decorated the front of the card.
Then I simply added the insert and voila, one sorry card from the moles to a lady who was upset she had to have them removed from her garden in such a distressing way. The card made her smile, it was a comfort to her and let's hope the moles are happier in their new home in the countryside.

Enjoy your weekend girls, back soon.
Tracie x

Friday, November 20

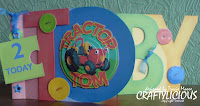
Toby Loves Tractor Tom

OK so I couldn't wait until tomorrow.
My great nephew was two yesterday, he's a big fan of tractor tom (a TV show for kids in the UK). So making a card for him was easy, use his name, tractor tom and two.I used "My Craft Studio" to make his name (like a word book) with B and Y on the back of the card and T and O on the front. I made some buttons in different colours and used diecut studio to make some tractor tom pyramage. Then just printed it all out.
Using eyelets I joined the back and front together, I cut out an extra T and B, added chalk around the edges to age the letters and added them to the card with 3d foam. I glazed the buttons with diamond glaze, waited for them to dry then added them to the card. I used a jigsaw piece to add the greeting with a little ribbon through the eyelets. finally I made the pyramage of tractor tom and added it to the centre of the O.I'm really love this one, and Toby's mum (my niece) loved it too.
Back later, ladies.
Tracie x

A Twilighter & Not Ashamed

OMGoodness, just got back from seeing New Moon with a friend, OMG it was fantastic ... awesome, I enjoyed it so much, I've booked to go Monday with my boys. If you haven't been yet, DO, its not completely true to the book but more so than Twilight was. I'm still buzzin ... lol.

I'll be back tomorrow with some cards, that's if I can calm down enough that is, see you then.
Tracie x

Monday, November 2

Baublelicious

Hello everyone, I don't know this years just been full off illness for me, I've had a major chest infection over the last week, to the point I've needed to take steroids and antibiotics. And I'm still feeling run down, but wanted to show you a quickie today. Before the chest infection I purchased these baubles real cheap (I mean 8 for 49p cheap), but they were plain and boring. So with some poinsettias I had in my stash, I jazzed them up a little. I just removed the tops, added the flowers and replaced the tops and added ribbon, so easy even the wallpaper could do it.
Hmm, maybe I need to go back and buy other colours?
Hope you like them and good health to all.
Tracie x

Friday, October 23

Fight like a Girl

I've a friend at work who has been diagnosed with breast cancer, and after seeing this image on splitcoast stampers, (a digi from whimsie doodles), I just had to make her a card.I used Fleur di lys spellbinder dyes and a ribbon with a flower and button, the image is coloured with whispers pens and I've added a few gems. Nothing more to say really.Just that all my hopes are with her.
Tracie x

Thursday, October 8

Poinsettia Passions

I am so excited to show you this card. I fell in love with the image as soon as I saw it. I limited the number of colours (red, black/silver and white), so it would give the traditional image a modern look.I simply printed out all the elements, matted the dp onto silver mirri and mounted it onto the red card base. Then I cut the image and some silver mirri with nesties label die, sprayed the flower layers with glitter varnish and decoupaged it up. I then added a chunky red bow with a heart pin and finished by adding red and silver gems to the poinsettia's. The verse I created in "mcs", and printed it out with the dp, I love making fancy greetings like this.So quick, so simple, but it's probably my favourite Christmas card I've ever made. Hope you like it too. Thanks for popping in.Tracie x

Fairie Dreams

Morning ladies, I've had a break for a couple of weeks ... catching up on family etc. I have a couple of cards today, both made using "My Craft Studio". You must all be fed up with me making cards using the PC, but I'm so in love with this program, I can't tell you how much fun it is to have complete control over the images you use. Choosing size, colour, orientation, tint the list goes on and on, anyway back to the cards.
On this one I wanted to use a floral corner image I found on "mcs - floral cd", it comes in decoupage layers, which I thought was a different slant on a card, rather than decoupaging the main image, decoupage the corner detail. I chose a fairy image and a butterfly and colour coordinated them with the corner image and dp. I matted the dp onto brown and gold mirri card, punching the bottom edges to make it pretty and then mounted this onto a burgundy card base.
I then matted the fairy onto brown and the greeting onto gold and brown card that I'd run through my cuttlebug with my scallop nesties and added both of these to the card with some brown organza ribbon in front of the fairy but behind the greeting. I continued by adding the corner decoupage and adding gold glitter pen the the flower centres so they would match the glitter on the butterfly. The butterfly I sprayed with gold glitter varnish, decoupaged the three layers up and added pink mini gems for the body. To finish I made two double bows (one slightly larger than the other) and glued them to the card.I love the way it's turned out, lovely and soft colours with a feel of magic. Hope you like it, back later.
Tracie x

Wednesday, September 23

Passionate about Poker

Morning ladies ... woke up to a dull day here, so a little crafting was in order to brighten my day. I have been playing on "my craft studio" over the past few days and designed this card, which is a real quickie. Just print out, cut out and stick.The poker decoupage is on "MCS - Carousel of Classics", so no real work needed there, all I really did was add the recipients name to the backing paper. I used 3d foam pads to add dimension and a little matting and layering. Quick, simple, yet a playful card for a passionate poker player.
Enjoy the rest of your day, thanks for stopping by.
Tracie X